

Occasionally you require making changes into your WP website (for example, changing the design or activating some plugins). Well, the good thing is there is a method for doing the same – just by making a local edition of your website for development and testing. Or possibly you wish to begin working on your new website however rather than doing all the process of development on remote server (that is, on the web), you wish to build a development website on your PC for trying things out. This does not only keep your website unseen from the world, but also accelerate your development as you will not need to wait for documents for uploading at the time of making changes.
In this tutorial, we are going to show you exactly how you can locally set up WordPress (that is, on your computer rather than on the internet). We will guide you through the step by step process. We hope that after reading this tutorial you will not be overwhelmed at all and you will be prepared to begin employing WordPress locally.
There are four steps to follow –
- Download and set up MAMP on your PC (this step should be followed by Mac and Windows users, because MAMP is no longer limited to Mac as it was once).
- Trigger local servers of MAMP and make a few changes in the port settings (non-compulsory).
- Make a database on your PC where the content of your website will be kept (which implies entering one word and just clicking single button).
- Set up WP with the use of popular five-minute install.
Reasons of Installing Local WordPress on your Mac
There are some of the strong reasons that’ll have you doubting why you did not execute this earlier –
-
You’ll Get the Choice to Work Offline
We are getting closer to a completely digital planet; however the time where you can take high-speed and ever-reliable web connection for granted is yet to arrive. Remote outages, alternating network coverage, and unanticipated travel are just 3 reasons your cautiously laid plans might be suddenly disrupted. Having a local installation accessible implies that you are free to work where, when and how you want. That’s valuable.
-
Better Design Visualization
Certainly, you wanted to have an improved design particularly if you do not wish your WP theme to appear a complete clone. Although, it’s a fact that there are loads of paid and free premium WordPress themes that you can purchase or download. However you need to think about the chances that you are not the single person who has installed it unless you have additional budget or money to appoint a professional to create a design for you. Yet, if you set up WordPress locally plus download a theme for installation then you can get an enhanced look of how will your upcoming website or blog will look like. Well, you can also prefer using Theme Junkie as their WP theme designs are responsive and you can effortlessly customize and add further CSS. You will not want your visitors or readers to come across a messy blog or website. Or also you do not want your readers to be shocked that the design continues to change when they’re viewing your site just as you are updating something.
-
Personal Backup
Everyone have their individual means to have backup their blog or website. It’s the most significant role of a company or person who has a site. You should have your personal backup. There are loads of plugins accessible to perform this for you. But, you have to think about that employing a plugin will use disk space on your web-hosting. This’ll be at your drawback if there is limited space in your disk hosting services. Some other web-hosting firms provide the similar thing such as HostGator website Backup which’ll charge you approximately 19.95 USD yearly. However, if you do not have the cash, then it would be a good idea to have a copy of local WordPress website. Though, it will need more effort you can be certain that you’ll have a copy of your site from which you can simply export back.
-
You’ll Be Quicker Across the Board
Despite the heaviness of your server, reading straight from your local disk is about to quicker always. All those page loads and remote database calls count quickly. If you choose to work on your local machines, you will shave hours of spared time off you operational week. You also set to gain from a general incidental effect on output. The kind of unpredictable, and unexpected delays you inexorably experience working on your remote setup is a real danger for flow and productivity. Just install your local setup on Mac and then you will be able to work efficiently and quickly across all the regions of WP within few hours.
-
You Can Evaluate Ideas More Rapidly
WP is said to be an awesome playground for business owners, marketers, developers, and designers, however the gap among execution and idea can be large at times. Despite your background, the capability to move from plan to archetype in a local and risk-free environment within few minutes will really change your resourceful game.
-
You will not Take Risk to Break the Active Website
Actually, doing severe development task straight on an active website – or making considerable changes without evaluating their effects locally first – is a smart move. You should stop doing the same. Whether you are developing themes or plugins, or seeking the particular website changes that will be installed on several websites, a local installation provide you a safe and stable working atmosphere for refining and testing your work before you install anything critical.
We hope that now you got the importance of a local install. So, let’s move on the actual process of installation.
Install MAMP
Before installing the MAMP on your Mac device, you will require downloading the same from the official website of MAMP. But, first of all let’s find out what MAMP actually is? The full form of MAMP is Macintosh-Apache-MySQL-PHP. These are the vital elements of your server stack, and jointly they provide you all the gear that you require for running a WP website on your PC. These four are the main ingredients of your server stack, and together they give you all the gear you need to run a WordPress site on your computer. MAMP needs that your Mac be operating Mac OSX 10.6.6 version so you need to be certain that your system is updated. At present, MAMP provides a beta edition for Windows users. If you’re on a PC and following along then you can certainly try it out. Once you’ve downloaded the software you need to click on the .pkg file and then install. Unless you consider buying MAMP, you need to be certain to consider the Installer prompt. As soon as you choose Installation Type, you’ll see a button namely Customize on the bottom-left corner. Click on that button and uncheck the MAMP Pro. This’ll help you to save some space on your hard disk drive. Now click on the install button.
Configuring MAMP
Now you have successfully installed the MAMP, go to the Folder “Applications” on your Mac. You should discover a new folder for the MAMP. within this folder you will get some applications and some more folders. For now MAMP should be the main concern. If you wish to work locally, then you should drag the application icon of MAMP into your dock and allocate it to remain there. Now just incite the application. It is very easy and provides some options from the beginning. This is great thing because it makes installation a breeze. So as to receive your local WP installation from the ground you require placing to keep these files that construct the software.
MAMP allocates a folder with the name “htdocs” by default to be the house for local websites. For this guide, we are going to use the default given by MAMP however we wish to indicate that you can allocate any folder on your PC to be your workplace for all of your sites installed locally.
A few people will frequently make use of a folder on their dropbox or that is edition controlled with Git to have access to backups always. For changing your main folder, just click on the “Preferences” on the Main screen of MAMP and click on the “Apache” tab. Here you’ll watch the route to your folder named htdocs which is allocated by default by MAMP. Seek the folder icon that is situated on above the folder-path. Click on the icon to allocate a new folder like your local website directory.
Launch MAMP
Open the software similarly you would open any other program on your PC. You’ll see the below screen.
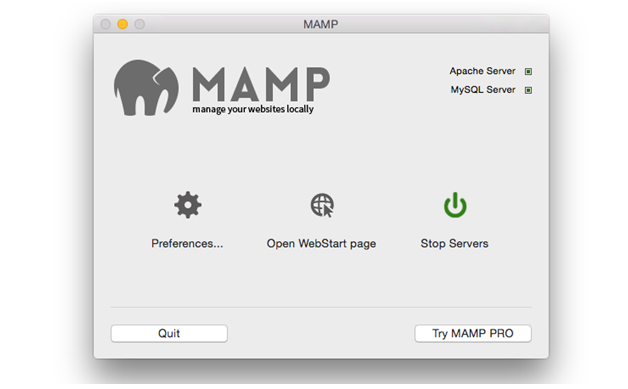
The little icon besides MySQL Server and Apache Server should appear and the power sign should become green. In case the power sign is not green or one or two boxes is not packed, you need to click on the Start Servers link. If you want to have the ports with the default setting, then you can leave the next step.
Editing Port Settings
If you want to change the port settings, you need to click on the Preferences link for opening the preferences window, and then just click on the option port. Modify the Apache Port area so it indicates 80 and then click on the button “OK”. Your setting will get changed and then you will be asked for admin password of your PC. Now you will need to make a database for your website.
Create a Database
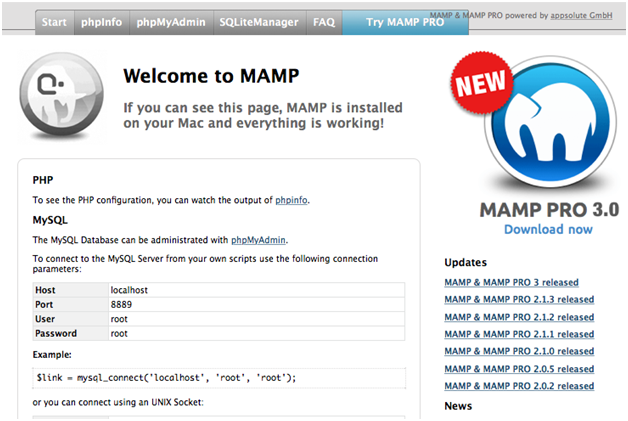
Go to the opening dialog box of MAMP, and then click on the button Open start page. After clicking the button in your browser, start page will get opened.
This window provides you the details of the database settings of MySQL, which you will require using afterwards when you go to install WordPress. Now you just need to click on the tab phpMyAdmin which is located on the top of the window for opening phpMyAdmin module. As soon as the tab is open, you need to click on the Databases option to see the databases window.
Now it’s time to make your database. In the field named ‘Create database’, enter the appropriate name for your database. If you are going to run one website locally, then you can name the database WordPress: However if you think to operate over one local website, it is useful to name your database that relates to your website. The name of the database may require being short compared to the name of your website, and you cannot comprise punctuation or spaces.
After giving an appropriate name to your database, just click on the create button. Now, your database will get created for your website. Now, let’s move on to the process of installing WordPress.
Install WordPress
Setting up or installing WordPress is really a fun experience. If you have installed WordPress on your own i.e. manually before installing on a remote-server you will get used to it. However, if you have dependent on installers always, read the complete guide.
Download WordPress and Move to the Folder named MAMP
Initially you will require entering a copy of WordPress. Visit the download page of WordPress and then download an updated version of it. As soon as you have downloaded the compressed file having WordPress, just open the file and copy the whole folder and paste it into htdocs folder of MAMP.
On a Mac system, this’ll be in the Applications-folder, thus your WP files will be included in the Applications > MAMP > htdocs > WordPress. However, on the computer system, your WP files will be located in c: /MAMP/htdocs/Wordpress. If you believe that you will be handling more than a single local website, just change the WordPress folder name to something more evocative, with no space. Now you can begin the process of installation.
The well-known Five Minute Install
Simply open up your browser and then type WordPress or localhost in the address bar at the top. If you did not choose to change the settings of your port previously, then you can write localhost:8888/wordpress. In case you employed something excluding WordPress as the name of your folder, then type that name. You will notice first of the set up screen, that will ask you to choose your preferred language you need to work in:
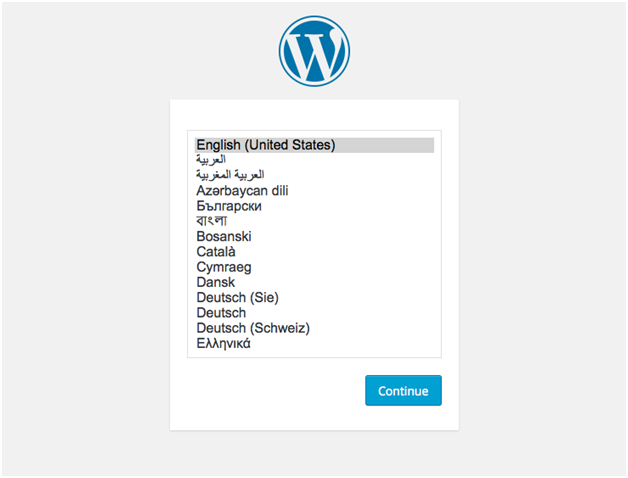
Choose your favorite language and then click on the Continue option. After that you will notice a screen that will tell you what kind of details regarding your database you will require installing WordPress:
Now visit the screen wherein you require inputting all your WordPress information:
Enter the below mentioned details –
- Name of the Database: WordPress (or any other name you provided your database at the time of creating it)
- User Name: type root
- Password: type root
- Database Host: type localhost
- Table Prefix: type wp_
Possibly you will find that the majority of these areas are pre-famed with the right settings in any case. Now just click on the button submit. You will get another screen which tells you that WP is communicating to your database, and it is the crucial step. To move into the next step click on the option Run the install. Then you will see a window which will ask you for the information of your website.
Enter the information for your website like you would do usually at the time of setting up WordPress on your web hosting. WP will persuade you for using a strong password, though that is not a big concern while working locally. Also, you may uncheck the Privacy checkbox, since Google will not be capable to use your local website anyway, however if you copy the website to a remote host later on, don’t forget to adjust that setting in admin window.
- At the end, just click on the option Install WordPress.
- Now, you will see a success window.
- Just click on the button named Log in for using your website.
When you log-in to your website you will be headed to the WordPress cPanel for your new website from where you can include content, set up themes and plugins, and whatever you would expect on a remote WP website. That’s it! You have successfully set up WordPress on your Mac. Now you can easily access it for creating a new development website or to bring in content from your remote website and assess it securely.
Summary
We hope, you have gone through this entire post. Now, you will not find the job of building a WP website locally so overwhelming. With the help of MAMP software, it’s easy to run local server, build a database and after that install WordPress. Now, you can easily employ your new website for testing themes and plugins and developing new ideas before employing them on your favorite website.