

Before moving on to the process of adding icons into custom wordpress menu, it is important to know about custom menus first. Well, custom menus are basically a list of usual links that are generally showed as the leading navigation for your website. The location of menus can differ as per your themes, because some themes provide extra menus like social links menus.
For adding first custom menus, you need to apply below methods –
Build a custom-menu
Go to the option, ‘click-my-site’, and then Customize. In that section, you need to click on the menus tab. In case your website theme has a primary/default menu already, then you can simply click on it for starting editing. When your theme does not contain a primary/default menu, then you need to click on the Menu ‘+ Add’. There you need to enter the name you have selected for your menu and then click on the button ‘create menu’.
Add menu-items
Besides pages that you have posted already, you can include various kinds of menu-items for your custom-menu:
- Page – includes a link to other web pages on your website.
- Custom Link – includes a custom domain linking to other website.
- Category – displays a feed of various blog-posts from a provided category.
- Tag – displays a feed of various blog-posts from a provided tag.
- Post – directly connects to a blog-post on your website.
For adding any of the above mentioned menu-items, follow the below process –
- Click on the button ‘+ Add Items’.
- Select a type of menu item from the provided list.
- Choose one of the choices showed for that specific type. For instance, click on ‘+ Home’ option to add a hyperlink to your website’s home page’ to the menu of your site.
- You also have the freedom to include some extra menus. For that, you need to click on the option ‘+ About’ for adding a hyperlink to your site’s About page to your website menu.
- If you wish to show this menu on your website, then choose a Display Location. For the central navigation, the right setting relies on your theme. It is frequently listed as Top, Header, or Primary.
In case your website theme provides a Social-Links Menu, then it’ll automatically change menu items to equivalent icons for some famous social networking websites.
Arrange your menu and include drop-down/sub-menus
If you wish to re-order your menu items, then you can easily shift your theme by clicking the link ‘Reorder’. Click down/up arrow keys for moving menu-items down or up in the list. And if you wish to remove or add an item from drop-down/ sub-menu menu, then you need to click on right or left arrow keys. On the other hand, you can also make use of the drag-and-drop feature. For this, simply, click on a menu-item that you want to move and then drag-and-drop under the main list of menu-item.
Remove menu items
To delete your menu-items, you need to click on them in the settings option in the left. After doing this, they will get bigger and show up a Remove button. You just need to click on that button for removing a menu item.
Formatting the text in the menu item
You can simply format the menu-item’s name through formatting the navigation tag. For doing the same, you need to click on the menu-item in the settings. The screen will enlarge and display a Navigation Label field. Here, you need to type the text that you want to show on your website.
Save all the changes
As soon as you have arranged your menus, be certain to click on the save and publish option for saving all the changes you have made in your custom menu.
How to Add Icons to Custom WordPress Menus Without Plugins
Here, we are about to explain how to add icons into the custom menus of your WordPress site without using any plugins. You might have seen a number of sites that make use of icons for showing categories as well as sub-categories in their menu. It’s a truth that icons next to the menu section seem extremely appealing visually. It also helps to make the site looks best and boosts the trust. If you are making use of free-themes, it is sure that there are no methods for adding icons to custom menus in your site without plugins. There are limited amount of premium themes that give the option, however you need to be a high-end user for availing it.
It doesn’t matter what kind of site you have, it would be good to make your site more visual compared to the textual, and therefore, you must include icons in the custom menu of your wordpress website without using any kind of plugins. Please follow the below steps –
-
Creating a Child-Theme
If you don’t picked a theme for your website, then to choose one and create. You can do this just by building a child theme of already available theme, which implies that you can make the necessary changes without doing anything into your existing theme. You can generate a child theme of your existing theme. If you don’t know how to create child theme then you can take the help of online guides and tutorial.
-
Activate Font Awesome
Another step is to set off the Font Awesome annals in your theme. Before doing the same, it is important to know something about Font Awesome. Font Awesome is nothing but a set of icons generated with the use of icon font. This implies that it doesn’t employ background images, like you might have performed in the past while including icons into your website. In its place, it makes use of CSS classes, including a pseudo-element to everything with an icon group. This pseudo-element includes a particular character prior to the element, along with the icon style. You will see an icon being showed right away before the element that you have included the CSS-class to.
Font Awesome is actually a font created with icons. It is not considered as a collection of images. Now the question is that why is this difference extremely vital? The reason is that icon fonts similar to Elegant Icon Font and Font Awesome are:
- Cross-browser friendly – icon fonts must run any browser.
- Customizable – you have the freedom to customize them similar to any other font like you can include animation, change colors and much more!
- Vectors – that implies they look wonderful despite what size they’re showed at.
At presently, Font Awesome provides a huge collection of 634 icons that you can include anywhere on your website. Also, it is consistent with both Divi plus other WordPress theme that you are employing.
Tips to add Font Awesome Icons Manually to WordPress
Well, you can simply make use of a plugin for adding Font Awesome icons. Plugin will help you to add them in your WordPress site with the use of some shortcodes, however you will yet require styling them manually.
But, people who want to do it manually; they can do the same with some easy steps. You just need to insert the Font Awesome stylesheet into your website. It will help you to add as well as style your icons with the use of CSS.
Step 1: add Font-Awesome Stylesheet into Functions.php
The stylesheet for Font-Awesome is a continuously simplified list of recent icons. This can be added in two methods –
- Download the most recent Font Awesome stylesheet upload the same into your website through FTP.
- Connect to the edition hosted by Bootstrap CDN.
Despite whatever option you pick, given steps will be the exact same. Only the real domain to the stylesheet will get changed. You just need to download the appropriate stylesheet and upload the same into your website through FTP and then copy the path of your file. After finishing this process, you need to insert the following code in the child theme’s functions.php file –
add_action( ‘wp_enqueue_scripts’, ‘enqueue_load_fa’ );
function enqueue_load_fa() {
wp_enqueue_style( ‘load-fa’, ‘https://maxcdn.bootstrapcdn.com/font-awesome/4.7.0/css/font-awesome.min.css’ );
}
After uploading the stylesheet into your website, the next step is to substitute the url to Bootstrap CDN along with the domain to the stylesheet that was hosted to your wordpress site. Just avoid adding the url to your stylesheet in header.php file.
Step 2: Insert Font Awesome Icons into your WordPress Website
After inserting the stylesheet, it’s time to add a few Font Awesome icons into your WordPress website. The process is very easy. Just add below mentioned code to insert icons.
<i class=”ICON NAME” aria-hidden=”true”></i>
Now, where you will discover the icon name? Well, it’s also very simple, you simply need to visit the official site of Font Awesome and seek icons –
You can reach it s committed webpage by just clicking on an icon. After that, you need to scroll down and look for the HTML code. If you want to use the icon into your post, you will require making sure to include them into the text menu of your WordPress Editor.
Step 3: Style Font Awesome Icons
The size of the default icon is extremely small. Every now and then, you will want to have some bigger icons on your site. Fortunately, you can easily do the same with the use of CSS. For making bigger icons, you can make an addition in the group of icon. Like you can increase the size of address book with the use of function “fa-3x” at the end part of the class.
<li><i class=”fa fa-address-book fa-3x”></i>
In addition, you can animate icons and rotate icons, and lots more. To get a complete list of all the changes, you need to explore some examples at Font Awesome’s site.
-
Adding CSS to the Menu Items
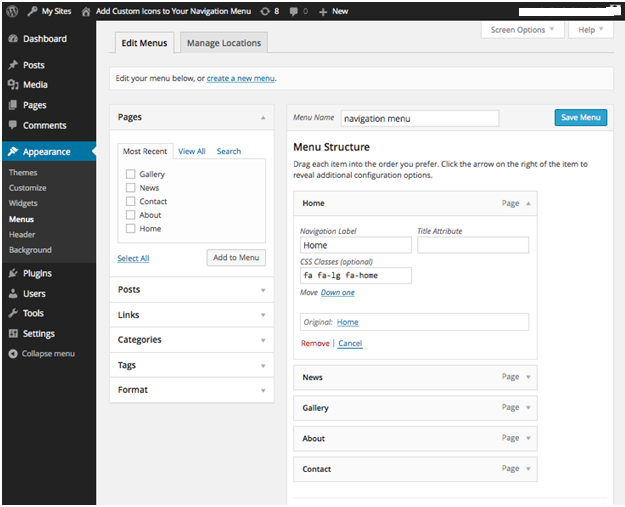
After registering the Font Awesome, now it’s time to employ the CSS classes it offers for adding icons into the menu-items. In your WordPress dashboard, you need to head to the option Appearance and then go to the menus option for edition your navigation menu. If you have not built navigation menu already, then you need to make one immediately and ensure that you have marked the checkbox in the menu option to get it to the Primary Navigation section into your theme.
WordPress enables you to include a CSS class to every item within your menu; however you are unable to view the section for this. Initially you need to turn it on.
- Click on the Screen Options
- Check the ‘CSS Classes’ checkbox
- Now close the tab ‘Screen Options’.
Well, you can insert a class to every menu item. Begin with the ‘Home’ tab. beside the menu item, click on the down arrow key to see further options regarding that menu-item.
fa fa-lg fa-home
This includes 3 classes into your menu-item:
- fa is employed for all items along with a Font-Awesome icon
- fa-lg is used to set the icon size to big
- fa-home is related to the particular icon that you wish to show.
Now, your menu’s admin interface will seem like this-
Now repeat the same process for your every menu-item. You will come across multiple icons as well as their classes on the icons page of Font Awesome.
Process to style the Menu-Items
Now you need to see the menu of your website. For example, see this –
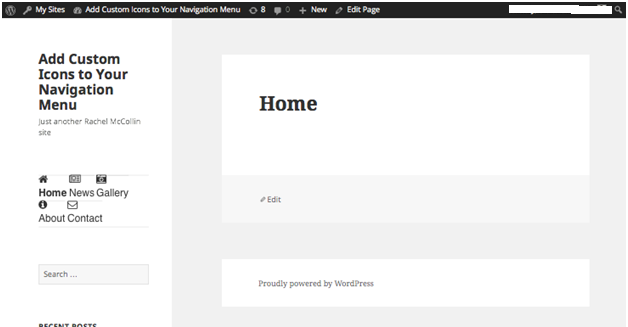
This is quite messy. In this menu, the fonts have changed. The icons appeared above the text whereas we want to have them to the left hand side, and the menu-items are adjacent to one another when they must be 1 above another. If you are doing work with your individual theme, then you may feel that your menu-items seem worse or better, plus you may require making some dissimilar tweaks. For fixing the problem here, we are about to include some styling into the stylesheet.
Let’s, begin by making the menu-items one over the other. Just open the stylesheet of your theme and include the following code into it:
.main-navigation ul li {
width: 100%;
}
This will make sure that every menu item-takes up 100 percent width of its holding element. Now, after refreshing the page your screen.
Now, the menu-items have arranged properly however the icons must be on the left hand side of every menu-item rather than over it. This can also be fixed by adding the below mentioned code into the stylesheet –
.fa::before {
float: left;
}
This code makes use of pseudo-element ‘::before’ that Font Awesome includes to every element you allot its class to. To shift the icons on the left hand side of the menu-text, you can make the contents of your pseudo-element float left. Now, don’t forget to save your stylesheet and then refresh the page. You will see that the icons are in the right place –
Now, the icons came to their right position however they could do with arranging. You can include some more styling for a width and margin. Edit the statement for the pseudo-element which you recently included into your stylesheet thus it reads like this –
.fa::before {
float: left;
margin-top: 8px;
width: 30px;
}
This includes a margin over the pseudo-element for lining it up with the text plus it also provides it a set width hence there’ll be a space among it plus the text however the text will be united. Now you will get something like this –
Well, this is much better. Now the ultimate step is to modify the menu text’s fonts. Including the Font-Awesome classes for every menu-item transformed the font employed for the icons plus text, thus we require changing that back. We are about to include styling for links in every list item into the menu, because that will not influence the icons, and we will employ the font from twenty-twelve theme.
In your stylesheet, add this:
.main-navigation ul li.fa.fa-lg a {
font-family: ‘Noto Serif’, serif;
font-size: 0.8em;
}
This aims the link in any menu-item that has been provided the fa-lg and fa classes, and regulates the font size and font. Now, the menu looks perfect.
Now, the navigation menu has been completed.
Conclusion
Including icons to your website is an extremely dissimilar process from whatever it was one or two years ago. Now, rather than using styling and uploading images to put them in the backdrop of the elements in the webpage, you can include icons with the use of font-based icon library. Here you have learned everything about using Font Awesome library for adding icons into your menu-items as well as styling them for looking cleaner. You can make use of this methods in conjunction with other elements in your website, for example, buttons, callouts, and lists just by making use of CSS classes offered by the Font Awesome library.